

How To Get Frame Number Animation Clip C# Unity
Animation tab
Switch to Scripting
Blitheness Clips are the smallest building blocks of blitheness in Unity. They stand for an isolated piece of motion, such as RunLeft, Leap, or Clamber, and can exist manipulated and combined in diverse ways to produce lively end results (run into Blitheness State MachinesA graph within an Animator Controller that controls the interaction of Blitheness States. Each state references an Animation Blend Tree or a single Animation Clip. More info
Come across in Glossary , Animator ControllerControls animation through Animation Layers with Blitheness State Machines and Animation Alloy Trees, controlled by Animation Parameters. The same Animator Controller tin be referenced by multiple models with Animator components. More info
Encounter in Glossary , or Alloy Trees). You can select Animation Clips from imported FBX information.
When you click on the model containing animation clips, these backdrop appear:
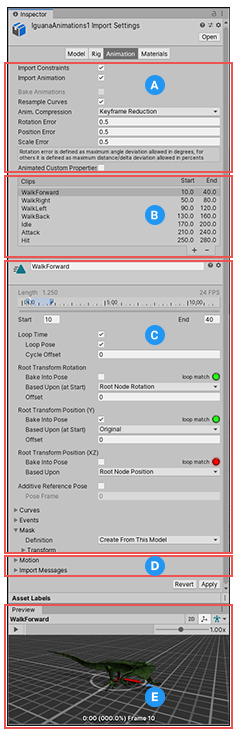
There are iv areas on the Animation tab of the Inspector A Unity window that displays information about the currently selected GameObject, asset or project settings, allowing yous to inspect and edit the values. More than info
See in Glossary window:
(A) Asset-specific properties. These settings define import options for the entire Asset.
(B) Prune selection list. You tin can select any item from this list to display its properties and preview its animation. You tin can also define new clips.
(C) Clip-specific backdrop. These settings define import options for the selected Blitheness Clip.
(D) Blitheness preview. You can playback the animation and select specific frames here.
Asset-specific properties
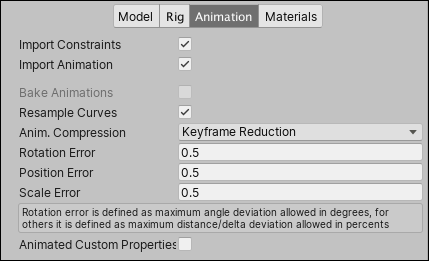
These properties apply to all animation clips and constraints defined inside this Asset:
| Property: | Function: | |
|---|---|---|
| Import Constraints | Import constraintsSettings on Joint components which limit motion or rotation. The type and number of constraints vary depending on the type of Joint. More info See in Glossary from this asset. | |
| Import Animation | Import animation from this asset. Notation: If disabled, all other options on this page are hidden and no animation is imported. | |
| Bake Animations | Bake animations created using IK or Simulation to forrad kinematic keyframes. Merely available for Autodesk® Maya®, Autodesk® 3ds Max® and Cinema 4D files. | |
| Resample Curves | Resample animation curves as Quaternion values and generate a new Quaternion keyframe for every frame in the blitheness. This option is enabled by default. Only appears if the import file contains Euler curves. | |
| Anim. Compression | The type of compression A method of storing data that reduces the amount of storage infinite it requires. See Texture Compression, Blitheness Compression, Audio Compression, Build Pinch. Meet in Glossary to use when importing the animation. | |
| Off | Disable animation pinch The method of compressing blitheness information to significantly reduce file sizes without causing a noticeable reduction in motion quality. Animation compression is a merchandise off between saving on retentiveness and paradigm quality. More info See in Glossary . This ways that Unity doesn't reduce keyframe A frame that marks the start or stop betoken of a transition in an animation. Frames in between the keyframes are called inbetweens. Come across in Glossary count on import. Disabling animation compression leads to the highest precision animations, but slower performance and bigger file and runtime memory size. Information technology is generally not advisable to use this option - if you demand higher precision animation, you should enable keyframe reduction and lower allowed Blitheness Pinch Error values instead. | |
| Keyframe Reduction A process that removes redundant keyframes. More info See in Glossary | Reduce redundant keyframes on import. If enabled, the Inspector displays Animation Pinch Errors options. This affects both file size (runtime memory) and how curves are evaluated. Merely for Generic Animation Type rigs. | |
| Keyframe Reduction and Compression | Reduce keyframes on import and compress keyframes when storing animations in files. This affects just file size: the runtime memory size is the aforementioned every bit Keyframe Reduction. If enabled, the Inspector displays Animation Compression Errors options. Simply for Legacy Animation Type rigs. | |
| Optimal | Let Unity decide how to compress, either by keyframe reduction or by using dumbo format. If enabled, the Inspector displays Animation Compression Errors options. Only for Generic and Humanoid Animation Type rigs. | |
| Animation Pinch Errors | Simply available when Keyframe Reduction or Optimal compression is enabled. | |
| Rotation Error | Set up the error tolerance (as an angle in degrees) for rotation curve compression. Unity uses this to determine whether or not information technology can remove a key on a rotation curve. This represents the minimum angle betwixt the original rotation value and the reduced value: | |
| Position Mistake | Set the error tolerance (as a pct) for position curve pinch. Unity uses this to determine whether or not it can remove a key on a position curve. For more than information, run into Setting fault tolerance for primal reduction on position and scale curves. | |
| Scale Error | Set the fault tolerance (every bit a percentage) for calibration curve pinch. Unity uses this to determine whether or not information technology tin can remove a key on a calibration curve. For more than data, see Setting error tolerance for key reduction on position and scale curves. | |
| Animated Custom Properties | Import any FBX properties that you lot designated every bit custom user backdrop. Unity only supports a pocket-size subset of properties when importing FBX files (such every bit translation, rotation, calibration and visibility). Notwithstanding, you can treat standard FBX backdrop like user properties by naming them in your importer script via the extraUserProperties member. During import, Unity then passes whatever named properties to the Nugget postprocessor just similar 'real' user properties. | |
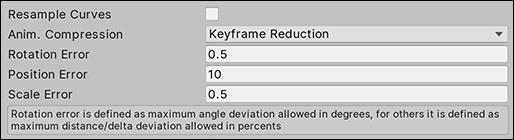
Setting error tolerance for key reduction on position and scale curves
Ready the error tolerance pct to determine whether or non Unity can remove a primal on a position or scale curve as a strategy for blitheness compression.
When you set the Anim. Compression property to "Keyframe Reduction" or "Optimal", Unity compares the original bend to what the curve looks similar later on removing a specific keyframe and applies this exam:
OriginalValue - ReducedValue > OriginalValue * percentageOfError Unity removes a keyframe if the delta between the original value and the reduced value is less than the original value multiplied past the error tolerance pct.
Annotation that the Unity compares the distances between the three curve components (that is, it compares altitude(x,y,z) ), and also per component ( altitude(10), distance(y), and then distance(z) ).
This instance demonstrates how Unity evaluates a reduction on the y-axis using an fault tolerance of 10%:
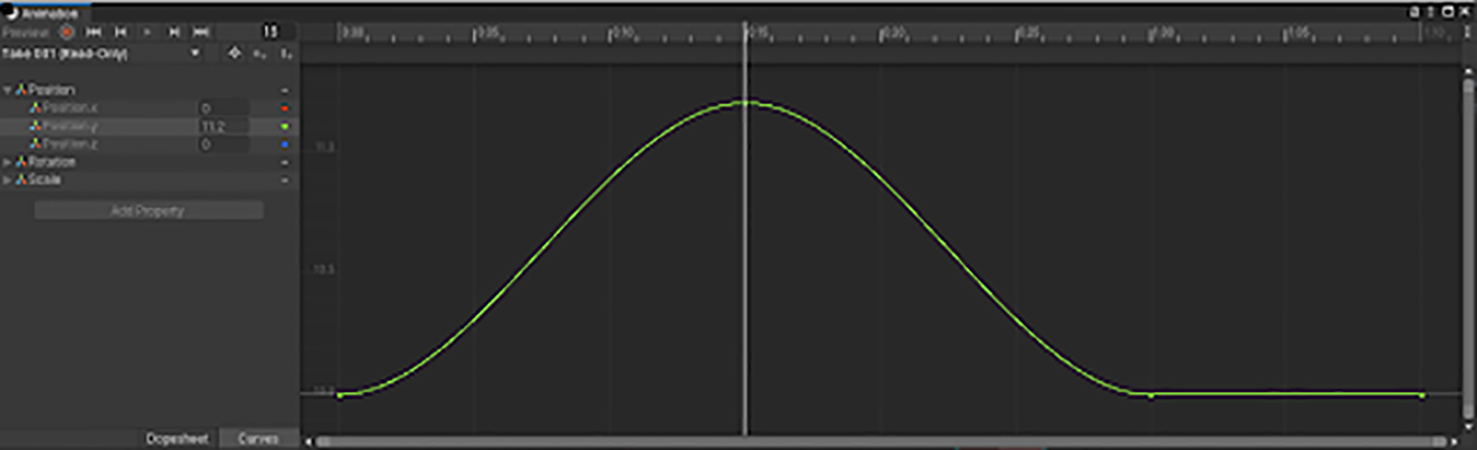
Keyframe A has a value of 11.two:
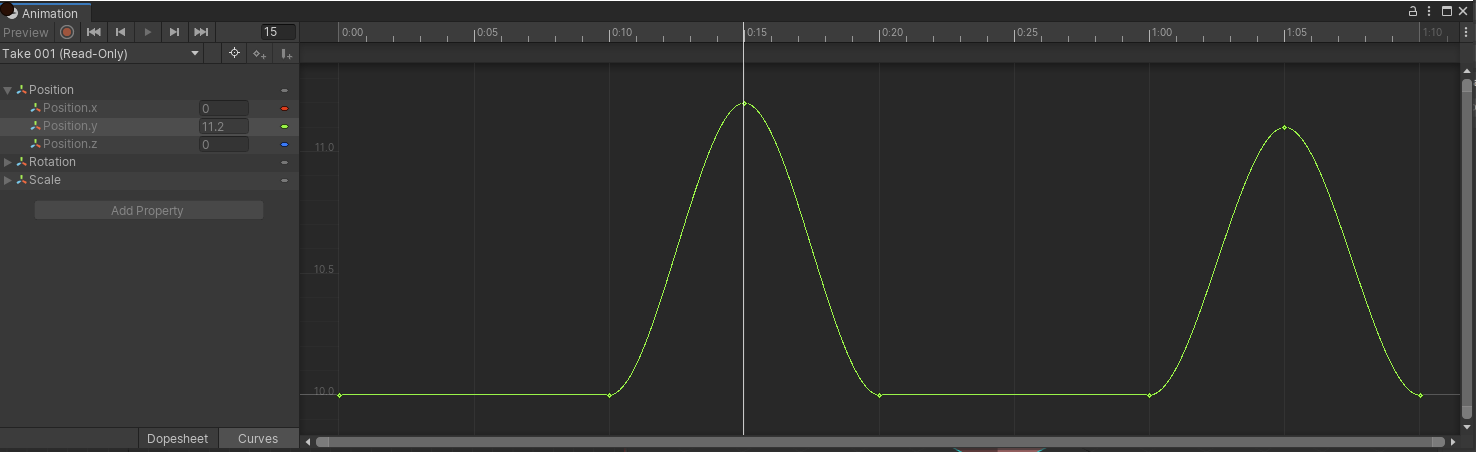
Keyframe B has a value of 11.ane:
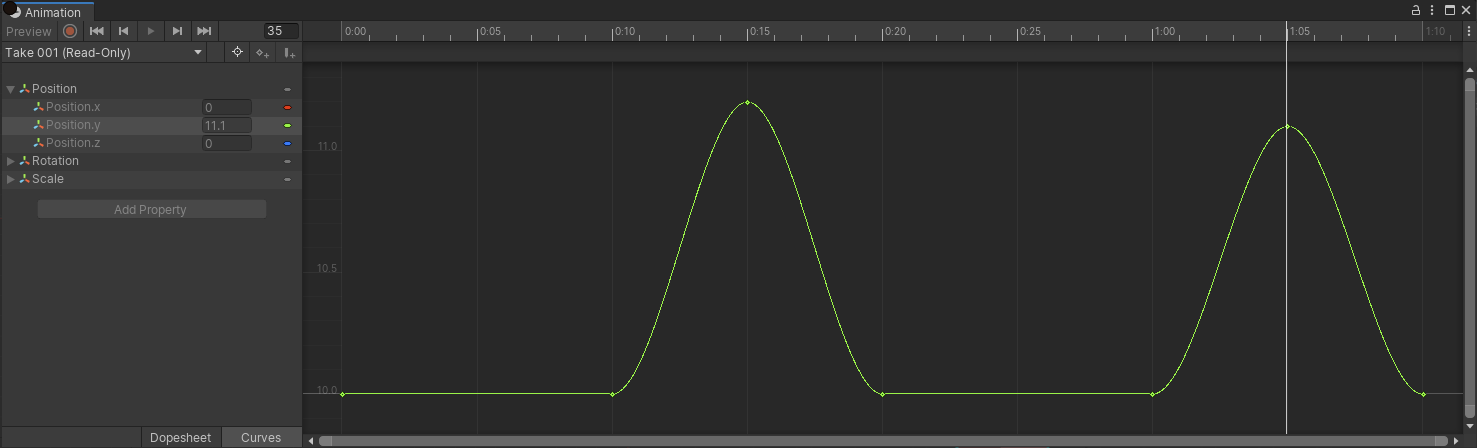
The resulting reduced curve looks like this:
Keyframe A is non reduced because:
- The distance between the original and reduced value is
D = 11.2 - ten = i.ii. - The error margin is
Due east = 10% * 11.two = one.12 - D > E
Keyframe B is reduced because eleven.1 - 10 < 10% * xi.1:
- The altitude between the original and reduced value is
D = xi.1 - 10 = ane.11 - The error margin is
E = 10% * 11.1 = 1.xi - D = E
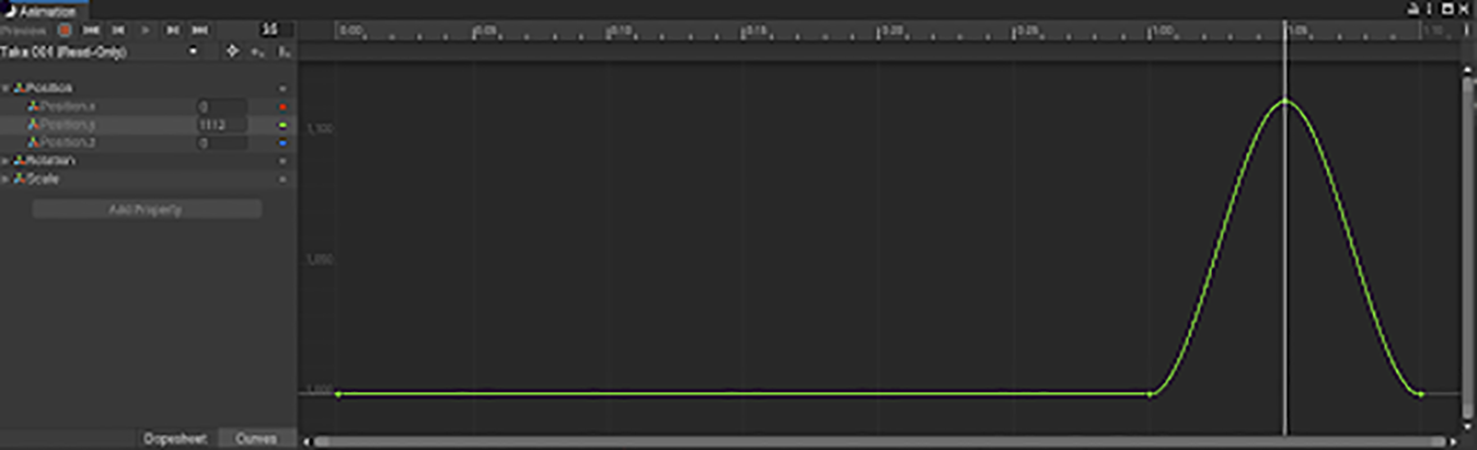
Note that this method has a limitation when using high values that vary only slightly. Moving the Scene A Scene contains the environments and menus of your game. Call up of each unique Scene file equally a unique level. In each Scene, you lot place your environments, obstacles, and decorations, essentially designing and building your game in pieces. More than info
See in Glossary 1000 units away results in substantially the same animation but located far from 0.

In this case, both keyframes are reduced.
Keyframe A is reduced because:
- The distance between the original and reduced value is
D = 1011.two - 1010 = 1.2 - The mistake margin is
Eastward = 10% * 1011.two = 101.12
Keyframe B is reduced because 11.i - 10 < 10% * eleven.one:
- The distance between the original and reduced value is
D = 11.1 - ten = 1.xi - The fault margin is
E = 10% * 1011.1 = 101.eleven
Higher values require a much larger difference between the original and reduced values for keyframes to remain in the reduced bend. Keyframe A has a value of 1100 and is discarded; keyframe B has a value of 1112 and remains:
Clip selection list
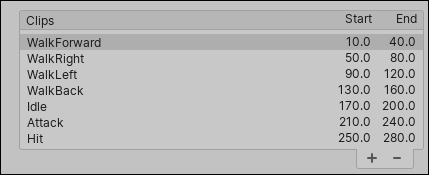
You can perform these tasks in this surface area of the Animation tab:
- Select a clip from the list to display its clip-specific backdrop.
- Play a selected clip in the clip preview pane.
- Create a new prune for this file with the add (
+) button. - Remove the selected clip definition with the delete (
-) button.
Warning: If you lot manually change any properties of the imported clips, Unity will not import new animation clips when the source Asset changes. For case, if you create a new prune or modify a prune'southward timing on the Animation tab, that clip listing volition non change even if you add clips to the FBX file outside of Unity. Unity volition ignore the new animation clips.
Clip-specific properties

This area of the Animation tab displays these features:
(A) The (editable) name of the selected clip
(B) The animation clip timeline
(C) Prune properties to control looping and pose
(D) Expandable sections for: defining curves, events, masks, and move roots; and viewing letters from the import process
You can set these properties separately for each animation clip defined inside this asset:
| Holding: | Function: | |
|---|---|---|
| Expanse A (editable proper noun) | ||
 | The take in the source file to use every bit a source for this animation clip. This is what defines a gear up of blitheness as separated in Motionbuilder, Autodesk® Maya® and other 3D packages. Unity tin can import these takes as private clips. You tin create them from the whole file or from a subset of frames. | |
| Expanse B (timeline features) | ||
 | You tin can use the drag the start and end indicators around the timeline to define frame ranges for each clip. | |
| Start | Start frame of the clip. | |
| Terminate | End frame of the clip. | |
| Expanse C (looping and pose command) | ||
| Loop Fourth dimension | Play the animation clip through and restart when the end is reached. | |
| Loop Pose | Loop the motion seamlessly. | |
| Bike Start | Starting time to the cycle of a looping animation, if it starts at a different time. | |
| Root Transform Rotation | ||
| Bake into Pose | Bake root rotation into the motion of the bones. Disable to store as root motion Movement of character's root node, whether it's controlled by the animation itself or externally. More info See in Glossary . | |
| Based Upon | Basis of root rotation. | |
| Original | Proceed the original rotation from the source file. | |
| Root Node Rotation | Use the rotation of the root node. Simply bachelor for the Generic Animation Type. | |
| Torso Orientation | Keep the upper torso pointing forward. Merely available for the Humanoid Blitheness Type. | |
| Offset | Commencement to the root rotation (in degrees). | |
| Root Transform Position (Y) | ||
| Bake into Pose | Bake vertical root motion into the move of the basic. Disable to store equally root motion. | |
| Based Upon (at Start) | Ground of vertical root position. | |
| Original | Keep the vertical position from the source file. | |
| Root Node Position | Use the vertical root position. Only available for the Generic Animation Type. | |
| Center of Mass Represents the average position of all mass in a Rigidbody for the purposes of physics calculations. By default it is computed from all colliders belonging to the Rigidbody, but can exist modified via script. More info See in Glossary | Continue center of mass aligned with the root transform position. Only bachelor for the Humanoid Blitheness Type. | |
| Anxiety | Keep feet aligned with the root transform position. Only available for the Humanoid Animation Type. | |
| Starting time | Starting time to the vertical root position. | |
| Root Transform Position (XZ) | ||
| Bake into Pose | Broil horizontal root motion into the movement of the bones. Disable to store as root motion. | |
| Based Upon | Footing of horizontal root position. | |
| Original | Proceed the horizontal position from the source file. | |
| Root Node Position | Apply the horizontal root transform position. Simply available for the Generic Animation Type. | |
| Center of Mass | Continue aligned with the root transform position. Only bachelor for the Humanoid Animation Blazon. | |
| Offset | First to the horizontal root position. | |
| Mirror | Mirror left and right in this prune. But appears if the Blitheness Blazon is set to Humanoid. | |
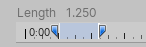
| Condiment Reference Pose | Enable to fix frame for the reference pose used as the base for the condiment animation layer. A blueish marking becomes visible in the timeline editor:  | |
| Pose Frame | Enter a frame number to use every bit the reference pose. You can also drag the blue mark in the timeline to update this value. Only available if Additive Reference Pose is enabled. | |
| Area D (expandable sections) | ||
| Curves | Aggrandize this section to manage animation curves on imported clips. | |
| Events | Expand this department to manage animation events on imported clips. | |
| Mask Tin can refer to a Sprite Mask, a UI Mask, or a Layer Mask More info See in Glossary | Aggrandize this section to manage masking imported clips. | |
| Motion | Expand this department to manage selecting a root motility node. | |
| Import Messages | Expand this section to see detailed information about how your animation was imported, including an optional Retargeting Applying animations created for one model to some other. More than info See in Glossary Quality Report. | |
Creating clips is substantially defining the start and stop points for segments of animation. In guild for these clips to loop, they should be trimmed in such a way to lucifer the first and last frame as all-time as possible for the desired loop.
Animation import warnings
If any problems occur during the blitheness import procedure, a alarm appears at the top of the Animations Import inspector:
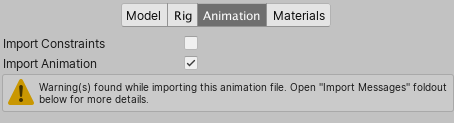
The warnings do non necessarily mean your animation has not imported or doesn't work. It may just hateful that the imported animation looks slightly unlike from the source blitheness.
To see more information, expand the Import Messages section:
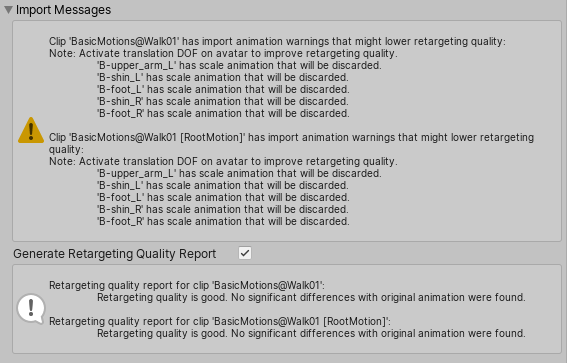
In this case, Unity has provided a Generate Retargeting Quality Report option which y'all tin can enable to encounter more than specific information on the retargeting issues.
Other warning details you may see include the post-obit:
- Default os length found in this file is different from the one found in the source avatar An interface for retargeting animation from one rig to another. More info
See in Glossary . - Inbetween bone default rotation found in this file is different from the 1 plant in the source avatar.
- Source avatar hierarchy doesn't match one institute in this model.
- This blitheness has Has translation animation that volition be discarded.
- Humanoid animation An animation using humanoid skeletons. Humanoid models by and large have the same basic structure, representing the major articulate parts of the trunk, head and limbs. This makes it piece of cake to map animations from one humanoid skeleton to some other, assuasive retargeting and inverse kinematics. More info
Run across in Glossary has inbetween transforms and rotation that will be discarded. - Has scale animation that will be discarded.
These messages indicate that some data present in your original file was omitted when Unity imported and converted your animation to its ain internal format. These warnings essentially tell yous that the retargeted animation may not exactly match the source animation.
Note: Unity does non support pre- and post-extrapolate modes (also known as pre- and post-infinity modes) other than constant, and converts these to constant when imported.
Blitheness preview
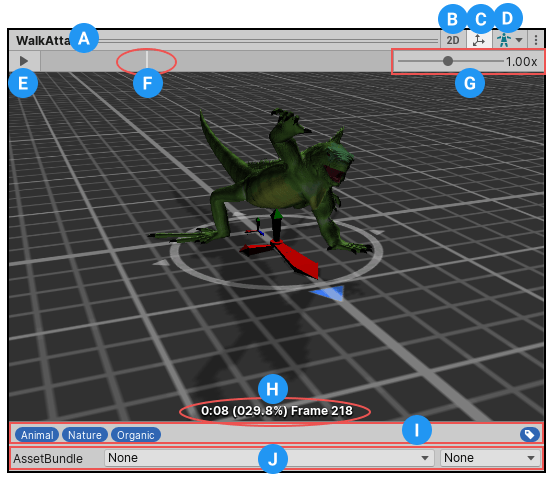
The preview surface area of the Animation tab provides these features:
(A) The name of the selected clip
(B) The 2D preview manner push button (switches between orthographic and perspective photographic camera)
(C) The pin and mass eye display button (switches betwixt displaying and hiding the gizmos)
(D) The Avatar selector (alter which GameObject volition preview the action)
(E) The play/pause button
(F) The playback head on the preview timeline (allows scrubbing dorsum and forth)
(One thousand) The animation preview speed slider (movement left to tiresome down; right to speed upwardly)
(H) The playback status indicator (displays the location of the playback in seconds, per centum, and frame number)
(I) The Tag A reference discussion which you can assign to one or more GameObjects to assist you lot place GameObjects for scripting purposes. For example, you might define and "Edible" Tag for any item the thespian can eat in your game. More info
Encounter in Glossary bar, where you lot can define and employ Tags to your clip
(J) The AssetBundles bar, where you lot can define AssetBundles and Variants
- Materials tab added in 2017.two NewIn20172
Source: https://docs.unity3d.com/Manual/class-AnimationClip.html
Posted by: campbellthrecties61.blogspot.com
0 Response to "How To Get Frame Number Animation Clip C# Unity"
Post a Comment